To replace the belt on your Troy Bilt riding mower, first, ensure the engine is turned off and the key is removed. Then, disconnect the spark plug wire and remove the deck covers to access the belt.
Carefully slide off the old belt and route the new one according to the mower’s manual. After securing the new belt, reassemble the covers, reconnect the spark plug wire, and test the mower. When it comes to maintaining your Troy Bilt riding mower, replacing the belt is a crucial task to ensure optimal performance and longevity.
Whether you’re a seasoned mower technician or a DIY enthusiast, following the correct procedure will help you get the job done efficiently. In this guide, we’ll provide you with simple and easy-to-follow steps for replacing the belt on your Troy Bilt riding mower, allowing you to maintain your equipment in top condition.

Credit: www.homedepot.com
Preparation For Belt Replacement
Preparation is key before replacing the belt on your Troy Bilt riding mower. Proper preparation ensures smooth and efficient execution of the replacement process, allowing you to ensure the longevity and optimal performance of your mower.
Tools Required
Before beginning the belt replacement, it is essential to gather the necessary tools to complete the task effectively. Here is a list of the tools required:
- Socket wrench set
- Screwdriver
- New belt compatible with your Troy Bilt riding mower model
- Jack or ramp (for lift if necessary)
- Gloves
- Safety goggles
Safety Precautions
Replacing the belt on a Troy Bilt riding mower involves working with moving parts and heavy machinery. Therefore, it’s crucial to take necessary safety precautions to prevent accidents and injuries. Here are some safety precautions to observe:
- Before starting the replacement, ensure the engine is off and the key is removed to prevent accidental starts.
- Wear protective gloves and safety goggles to protect your hands and eyes from potential injuries and debris.
- Allow the mower to cool down before replacing the belt to prevent burns from hot engine components.
- Use a jack or ramps to safely lift the mower for better access to the belt assembly, ensuring the mower is on level ground when performing the replacement.
- When working under the mower, ensure it is adequately supported using jack stands to prevent accidental collapses.
Identifying The Belt To Be Replaced
If you notice irregularities in your Troy Bilt riding mower’s performance, it might be time to replace the belts. But before you do that, you need to identify the specific belt that needs replacement. This section will guide you through the process of identifying the belt to be replaced.
Locating The Belt
The first step is to locate the belt that needs replacement. Inspect the mower to find the belts that are connected to the engine and the cutting deck. These belts are usually visible when you look under the hood or the mower chassis.
Inspecting The Belt For Wear And Tear
After locating the belt, inspect it for signs of wear and tear. Look for cracks, fraying, or any other visible damage. A worn-out or damaged belt can cause the mower to underperform or lead to potential safety hazards. Use this opportunity to check for proper tension and alignment as well.
Removing The Old Belt
When it comes to maintaining your Troy Bilt riding mower, knowing how to replace the belt is an essential skill. One of the key steps in this process is removing the old belt. In this guide, we’ll walk you through the process, step by step, to ensure a smooth replacement. So, let’s get started by addressing the first crucial step: Releasing the Tension.
Releasing The Tension
Before you can remove the old belt from your Troy Bilt riding mower, you need to release the tension in the belt. To do this, locate the tensioner pulley, usually positioned near the engine. Using an appropriately sized wrench, turn the tensioner pulley to release the tension on the belt. Be cautious while releasing the tension to avoid any accidental injuries.
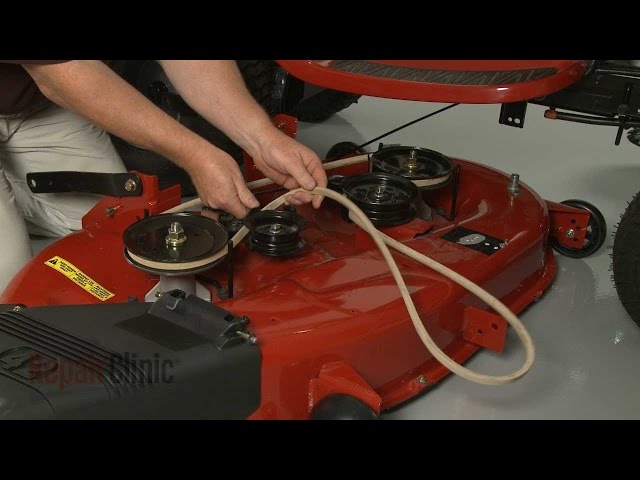
Sliding Off The Belt
Once the tension has been released, you can proceed to slide off the old belt from the pulleys. Starting from the top or bottom, carefully slide the belt off each pulley, ensuring it is completely free from the mower’s system. Inspect the belt for any signs of wear or damage, and take note of its layout to ease the installation of the new belt.
Installing The New Belt
Now that you have successfully removed the old belt, it’s time to install the new one. Follow these steps to ensure a smooth replacement process.
Placing The New Belt
Begin by placing the new belt around the engine pulley, ensuring it fits snugly with no twists or kinks. Then, position the other end of the belt onto the drive pulley of the mower’s deck, making sure it is properly aligned and seated in the pulley groove. Take your time to ensure the belt is positioned accurately to avoid issues with operation later on.
Restoring Tension
Once the new belt is in place, you need to restore tension to ensure proper operation. Follow the manufacturer’s guidelines to adjust the tension, which usually involves using a tensioning knob or lever. Ensure the tension is neither too loose nor too tight, as this can affect the mower’s performance and the lifespan of the belt.
Testing The Replacement
If you’ve successfully replaced the belt on your Troy Bilt riding mower, the next crucial step is testing the replacement. Before you put the mower back to work, you want to ensure that the new belt functions properly and is installed correctly. Testing the replacement involves running the mower and verifying belt performance. Here’s how you can proceed with the testing process.
Running The Mower
Once the new belt is in place, start the Troy Bilt riding mower and let it run for a few minutes. Observe the functionality of the mower as it runs. Listen for any unusual sounds or vibrations that could indicate an issue with the new belt.
Verifying Belt Performance
To verify the performance of the replacement belt, engage the mower’s blades and drive. Observe how the mower operates when you engage these functions. Check for proper blade engagement and smooth operation of the drive system.
Frequently Asked Questions For How To Replace Belt On Troy Bilt Riding Mower
How Often Should I Replace The Belt On My Troy Bilt Riding Mower?
It’s recommended to replace the belt on your Troy Bilt riding mower every 2-3 years or after 100 hours of use. Regular inspection is also important to ensure optimal performance and prevent unexpected breakdowns.
What Tools Do I Need To Replace The Belt On My Troy Bilt Riding Mower?
You’ll need a socket wrench, pliers, and a belt replacement tool. It’s important to use the specific tools recommended by Troy Bilt to ensure smooth and safe replacing process.
Can I Replace The Belt On My Troy Bilt Riding Mower Myself Or Do I Need A Professional?
With the right tools and instructions, replacing the belt on your Troy Bilt riding mower can be a DIY task. However, if you’re uncertain about the process, it’s always best to consult with a professional for assistance.
What Are The Signs That Indicate The Belt On My Troy Bilt Riding Mower Needs Replacement?
Common signs of a worn-out belt include squealing or grinding noises, reduced cutting or driving power, and visible damage or wear on the belt. Regular inspection of the belt is crucial to detect these signs early.
Conclusion
Replacing the belt on your Troy Bilt riding mower is a manageable task that can significantly improve the performance of your equipment. By following the steps outlined in this guide, you can ensure the proper functioning of your mower and extend its lifespan.
Regular maintenance is key to keeping your equipment in top shape for years to come.